Access points are a wireless layer 2 extension to your network, which use the protocol 802.11. There are controller based access points and stand alone access points. Controller based access points give you the feature of managing all your access points and wlans, or “wireless local area networks” on one “pane of glass”. That being said, there are access points that are layer 3. They allow for roaming between subnets for example when you’re moving from one access point on a subnet to another access point on a different subnet, there will be a handoff on the controller(s).
In order to give an example of access points, I bought some reburbished access points from CXTEC, a company I like to use for networking gear, and I bought a wireless lan controller off of Amazon. They were not very expensive. I got some old 1142 access points and and an old 4402 WLC which are not supported by Cisco any more, but it was a fun little home project, and I’ve been wanting to increase the wireless coverage in my house and also I brushed up on wireless technologies that I was getting rusty on. Before you go out and buy wireless equipment, make sure you look at the compatibility matrices on the Cisco web site and make sure your controller is compatible with your access points.
So, the first step is configure your controller for the basics. One of the most confusing things about the Cisco controllers is just getting connected in the first place. The easiest way is to web into the gui which by default is 192.168.1.1, so just configure your laptop on the 192.168.1.0/24 network and connect an ethernet cable from your laptop to the far left rj45 connection on the front of the device, which is the “service port”
If you want to configure with cli you will need to connect to the console with a female db9 and RJ45 converter. Part number 04-0495-01, terminal connector. Personally, I like to use the gui for basic configuration and startup and the cli for troubleshooting problems.
- IP address assignment. For this network, since I don’t have a dhcp server setup yet, I configured the wireless access point on the same network as the controller. I used a console cable to get into the wireless access point. Default username and password for Cisco Wireless is cisco/Cisco. It’s case sensititive.
- Configure the WLC for basic operation. You need to configure the controller for what country you are in. You need to configure the interfaces, and then you need to configure a WLAN. A WLAN is an SSID, that your client will connect to. You can configure your WLAN to broadcast or not broadcast. I suggest when starting to configure it to broadcast at first and then you can turn it off later, If you don’t want your neighbors to see it. It makes it easier to troubleshoot if your SSID is broadcasting.
- Configure a switch to connect the WLC and your access points. Since my access point is on the same vlan (I used vlan 7). I created vlan 7 for Access points on my switch and trunked it to port 1 of my WLC. I created an interface for my clients, vlan 10. I also trunked that vlan between the switch and the WLC.
- Next I configured the switch for the AP. I used vlan 7 so I configured an access port for vlan 7 and connected by AP. It’s an AIR-LAP-1142N-AK9. Since I don’t have a POE switch, I had to get some power injectors. The Power injectors I got were air-pwrinj6, which can provide 30W. I could have used air-pwrinj4, with will provide15 watts, since my wireless access point only uses 12.95W at most. See below for the 1140 specs.
The next step is to register the APs for the WLC.
How does a Cisco Wireless Access Point register with the controller?
Taken from the Cisco Web site and added my personal notes in bold.
The AP goes through this process on startup:
- The LAP boots and DHCPs an IP address if it was not previously assigned a static IP address. (Note, that I manually configured my access point with an ip address on the 7.7.7.0/24 network, giving it 7.7.7.254.
2. The LAP sends discovery requests to controllers through the various discovery algorithms and builds a controller list. Essentially, the LAP learns as many management interface addresses for the controller list as possible via:
- DHCP option 43 (good for global companies where offices and controllers are on different continents)
- Step 2: Configure a DNS entry for cisco-capwap-controller to ensure local businesses can find controllers and identify where new APs join. Note: If you use CAPWAP, make sure that there is a DNS entry for cisco-capwap-controller. On my switch, I configured a host as “cisco-capwap-controller” with ip address 7.7.7.7.
- Management IP addresses of controllers the LAP remembers previously
- A Layer 3 broadcast on the subnet
- Statically configured information
- Controllers present in the mobility group of the WLC the AP last joined
- For a successful configuration, ensure your DNS server is properly set up to resolve the domain name.
3. Send a discovery request to every controller on the list and wait for the controller’s discovery reply which contains the system name, AP-manager IP addresses, the number of APs already attached to each AP-manager interface, and overall excess capacity for the controller.
4. Look at the controller list and send a join request to a controller in this order (only if the AP received a discovery reply from it):
- Primary Controller system name (previously configured on LAP)
- Secondary Controller system name (previously configured on LAP)
- Tertiary Controller system name (previously configured on LAP)
- Master controller (if the LAP has not been previously configured with any Primary, Secondary, or Tertiary controller names. Used to always know which controller brand new LAPs join)
- If none of the above are seen, load balance across controllers using the excess capacity value in the discovery response.If two controllers have the same excess capacity, then send the join request to the first controller that responded to the discovery request with a discovery response. If a single controller has multiple AP-managers on multiple interfaces, choose the AP-manager interface with the least number of APs.The controller will respond to all discovery requests without checking certificates or AP credentials. However, join requests must have a valid certificate in order to get a join response from the controller. If the LAP does not receive a join response from its choice, the LAP will try the next controller in the list unless the controller is a configured controller (Primary/Secondary/Tertiary).
5. When it receives the join reply, the AP checks to make sure it has the same image as that of the controller. If not, the AP downloads the image from the controller and reboots to load the new image and starts the process all over again from step 1.
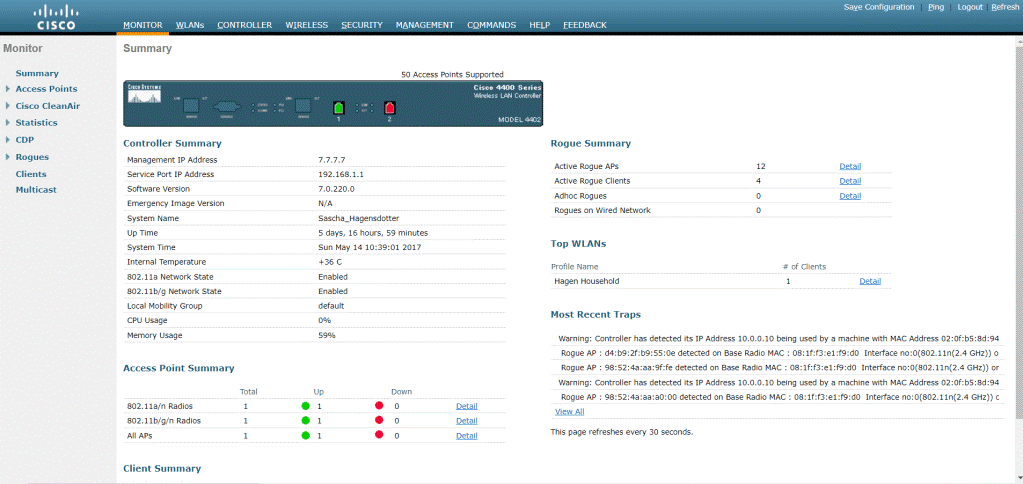
6. If it has the same software image, it asks for the configuration from the controller and moves into the registered state on the controller.After you download the configuration, the AP might reload again to apply the new configuration. Therefore, an extra reload can occur and is a normal behavior. ******Troubleshooting notes about this step. I could not get my access point to register with the controller at first, so I did some troubleshooting of the controller ip address, making sure it was on the same subnet, making sure the trunk was configured correctly and that the switch could ping the controller. In order to do this, I gave the vlan, vlan 7, and ip address under the SVI, switched virtual interface an ip address of 7.7.7.2. Once I got connectivity, I still could not register, so I turned on a debug on the access point, it was “debug ap enable”. When I was getting an error message about the certificate, I googled the error message and found a workaround. I found that the certificates on my Access Points are expired and the Controller was basically telling me your certificates are too old and you can’t join. So, one workaround was to tell the controller that it is older than the Access Points. I put in a date on the controller before the certificates expired in 2019, back in 2017, tricking the controller into thinking the certificates had not expired. That did the trick! Here is the golden, exciting moment that every Wireless Engineer loves to see on his controller:
Access Point Summary, shows one access point. From there you can configure your access point by clicking on “detail”.
From here, I checked if my access point was advertising my wlan, with my laptop. I could see the wlan, on my laptop as “connected”, but “no internet”. This is because there was no ip address yet.
7. Checked my Comcast wired connection. The dhcp is 10.0.0.0/24 with gateway of 10.0.0.1. I configured my switchport as vlan 10 to connect to the spare interface on my Comcast modem. I configured vlan 10 to trunk to my WLC. I configured interface “client” on my WLC with subnet 10.0.0.0/24 and gateway 10.0.0.1 (Comcast modem dhcp). I applied my “client” subnet to the SSID that I had created. Reconnected my laptop to the SSID, and got an ip address, and checked my access to the internet. New Wireless Network is configured for my home. Next project is configure a firewall to protect my clients.
Note: Some of these are not private addresses. If there is any chance that your network will be connected to the internet, you need to make sure that you are not using IANA purchased internet addresses such as 7.7.7.0/24 or 8.8.8.0/24. These are already purchased addresses and you cannot legally advertise them on the internet.
